Flash: Motion Tweens #2

You will use flash to create the following "Flash Movie" which contains three motion tweens and uses "motion guides."

1) Open Flash CS3

Instructional Movie: Motion Tween 2: The Square

Instructional Movie: Motion Tween 2: The Triangle

Instructional Movie: Motion Tween 2: The Oval and Resizing


  • Start/Programs/ Adobe Web Standard/ Flash CS3
2) Create a "Blue" Square in Frame 1 of Layer 1.
  • Right Click in Frame 1 of Layer 1 and select "Insert Keyframe.
  • Pick the Rectangle Tool.
  • Set the "Outline Colour" and "Fill Colour" to blue.
"Rectangle Tool"

Outline Colour

Fill Colour

  • Hold down the shift key and draw a Blue Square in the left side of the "work space."
    • Holding down shift makes it a "perfect" square.
3) Create a "Key Frame" in Frame 20 of Layer 1.
  • Right click in Frame 20 and select "Insert Keyframe"
4) Create a "Guide Layer" above Layer 1 and draw a "motion path" for the "blue square."
  • Click the "Add Guide Layer" button located at the bottom of the layers palette.
  • Insert a Key Frame into Frame 1 of the "Guide: Layer 1.
  • Using the Pencil Tool draw the "path" that you want the "Blue Square to follow.
  • Insert a Key Frame into Frame 20 of the "Guide: Layer 1."
5) Attach the Blue Square to the ends of the "Guide Path", hide the guide path and "Create A Motion Tween"["Create Classic Tween CS4] for Layer 1.
  • Click in Frame 1 of Layer 1.
  • Move the Blue Square so that it it centred over the end of the "Motion Path."
    • A small circle appears as you centre the square over the end of the line.
  • Click in Frame 20 of Layer 1.
  • Move the Blue Square so that it is centred over the opposite end of the "Motion Path.
  • Follow instructions from earlier exercises to Create A Motion Tween in Layer 1.
  • Test the animation by clicking Enter to see if the Blue Square "follows" the "Guide Path."
  • Hide the "Guide Path" by clicking under the "eyes" column on the "Guide: Layer 1.
    • The Guide Path should disappear but will still control the Blue Square.
  • Give the "motion" a "rotation."
    • Click in one of the motion tween frames (with the arrow)
      • Windows/ Properties
      • In Properties select a rotation.
        • CW for clockwise
        • CCW for counterclockwise.
      • Select the number of times you want it to rotate.

Instructional Movie: Motion Tween 2: The Triangle

6) Add a third layer make sure there is a Key Frame in Frame 1 of Layer 3.

Instructional Movie: Motion Tween 2: The Oval and Resizing

7) Create a Yellow Oval in the upper right hand corner of the work area.

8) Insert a Key Frame into Frame 20 of Layer 3.

9) Reduce the size of the Yellow Oval to 20% in Frame 20.

  • Select the Yellow Oval in Frame 20.
  • Windows/ Transform.
    • Check off "Constrain" box
    • Set horizontal and vertical setting to 20%.

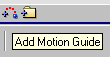
10) Create a "Guide Layer" above Layer 3 and draw a "motion path" for the Yellow Oval in Frame 1 of "Guide: Layer 3."

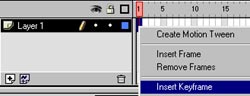
11) Insert a Key Frame into Frame 20 of "Guide: Layer 3."

12) Attach the Yellow Oval to the ends of the "Guide Path", hide the guide path and "Create A Motion Tween" ["Create Classic Tween in CS4] for Layer 3

13) Click the "Orient To Path" box in the "Frame Window."

14) Add a fifth layer and make sure there is a Key Frame in Frame 1 of Layer 5.

15) Create a Green Triangle in the lower right hand corner of the work area.

16) Insert a Key Frame into Frame 20 of Layer 5.

17) Create a "Guide Layer" above Layer 5 and draw a "motion path" for the Green Triangle in Frame 1 of "Guide: Layer 5."

18) Insert a Key Frame into Frame 20 of "Guide: Layer 5."

19) Attach the Green Triangle to the ends of the "Guide Path", hide the guide path and "Create A Motion Tween" for Layer 5.

20) Click the "Orient To Path" box in the "Frame Window."

21) Save as "MotionTween2.fla" in your C Drive of G Drive space in a folder called Flash.

22) Add to your web portfolio.

Adding Flash To Your Web Portfolio